Skyline timeseries异常判定算法

Skyline内部提供了9个预定义的算法,这些算法要解决这样一个问题:

input:一个timeseries
output:是否异常

3-sigma

一个很直接的异常判定思路是,拿最新3个datapoint的平均值(tail_avg方法)和整个序列比较,看是否偏离总体平均水平太多。怎样算“太多”呢,因为standard deviation表示集合中元素到mean的平均偏移距离,因此最简单就是和它进行比较。这里涉及到3-sigma理论:

In statistics, the 68–95–99.7 rule, also known as the three-sigma rule or empirical rule, states that nearly all values lie within 3 standard deviations of the mean in a normal distribution.

About 68.27% of the values lie within 1 standard deviation of the mean. Similarly, about 95.45% of the values lie within 2 standard deviations of the mean. Nearly all (99.73%) of the values lie within 3 standard deviations of the mean.

简单来说就是:在normal distribution(正态分布)中,99.73%的数据都在偏离mean 3个σ (standard deviation 标准差) 的范围内。如果某些datapoint到mean的距离超过这个范围,则认为是异常的。Skyline初始内置的7个算法几乎都是基于该理论的:

stddev_from_average

def stddev_from_average(timeseries):
    """
    A timeseries is anomalous if the absolute value of the average of the latest
    three datapoint minus the moving average is greater than one standard
    deviation of the average. This does not exponentially weight the MA and so
    is better for detecting anomalies with respect to the entire series.
    """
    series = pandas.Series([x[1] for x in timeseries])
    mean = series.mean()
    stdDev = series.std()
    t = tail_avg(timeseries)

    return abs(t - mean) > 3 * stdDev

该算法如下:

  1. 求timeseries的mean
  2. 求timeseries的standard deviation
  3. 求tail_avg到mean的距离,大于3倍的标准差则异常。

注释中写着会计算moving average,但是代码直接计算的mean,跟moving average没有关系,这比较不和谐。

该算法的特点是可以有效屏蔽 “在一个点上突变到很大的异常值但在下一个点回落到正常水平” 的情况,即屏蔽单点毛刺:因为它使用的是末3个点的均值(有效缓和突变),和整个序列比较(均值可能被异常值拉大),导致判断正常。对于需要忽略 “毛刺” 数据的场景而言,该算法比后续的EWMA/mean_subtraction_cumulation等算法更适用(当然也可以改造这些算法,用tail_avg代替last datapoint)。

first_hour_average

def first_hour_average(timeseries):
    """
    Calcuate the simple average over one hour, FULL_DURATION seconds ago.
    A timeseries is anomalous if the average of the last three datapoints
    are outside of three standard deviations of this value.
    """
    last_hour_threshold = time() - (FULL_DURATION - 3600)
    series = pandas.Series([x[1] for x in timeseries if x[0] < last_hour_threshold])
    mean = (series).mean()
    stdDev = (series).std()
    t = tail_avg(timeseries)

    return abs(t - mean) > 3 * stdDev

和上述算法几乎一致,但是不同的是,比对的对象是 最近FULL_DURATION时间段内开始的1小时内 的数据,求出这段datapoint的mean和standard deviation后再用tail_avg进行比较。当FULL_DURATION小于1小时(86400)时,该算法和上一个算法一致。对于那些在一段较长时间内匀速递增/减的metrics,该算法可能会误报。

stddev_from_moving_average

def stddev_from_moving_average(timeseries):
    """
    A timeseries is anomalous if the absolute value of the average of the latest
    three datapoint minus the moving average is greater than one standard
    deviation of the moving average. This is better for finding anomalies with
    respect to the short term trends.
    """
    series = pandas.Series([x[1] for x in timeseries])
    expAverage = pandas.stats.moments.ewma(series, com=50)
    stdDev = pandas.stats.moments.ewmstd(series, com=50)

    return abs(series.iget(-1) - expAverage.iget(-1)) > 3 * stdDev.iget(-1)

该算法先求出最后一个datapoint处的EWMA(Exponentially-weighted moving average)mean/std deviation,然后用最近的datapoint和3-sigma理论与之进行比对。

Moving Average

给定一个timeseries和subset长度(比如N天),则datapoint i 的N天 moving average = i之前N天(包括i)的平均值。不停地移动这个长度为N的“窗口”并计算平均值,就得到了一条moving average曲线。

Moving average常用来消除数据短期内的噪音,显示长期趋势;或者根据已有数据预测未来数据

Simple Moving Average

这是最简单的moving average,为“窗口”内datapoints的算数平均值(每个datapoint的weight一样):

SMA(i) = [p(i) + p(i-1) + … + p(i-n+1) ]/ n

当计算i+1处的SMA时,一个新的值加入,“窗口”左端的值丢弃,因此可得到递推式:

SMA(i) = SMA(i-1) + p(i)/n – p(i-n+1)/n

实现起来也很容易,只要记录上次SMA和将要丢弃的datapoint即可(最开始的几个是没有SMA的)。Pandas中可用pandas.stats.moments.rolling_mean计算SMA。

SMA由于过去的数据和现在的数据权重是一样的,因此它相对真实数据的走向存在延迟,不太适合预测,更适合观察长期趋势。

Exponential moving average

有时也称Exponential-weighted moving average,它和SMA主要有两处不同:

  1. 计算SMA仅“窗口”内的n个datapoint参与计算,而EWMA则是之前所有point;
  2. EWMA计算average时每个datapoint的权重是不一样的,最近的datapoint拥有越高的权重,随时间呈指数递减。

EWMA的递推公式是:

EWMA(1) = p(1)                         // 有时也会取前若干值的平均值。α越小时EWMA(1)的取值越重要。
EWMA(i) = α * p(i) + (1-α) * EWMA(i – 1)     // α是一个0-1间的小数,称为smoothing factor.

可以看到比SMA更容易实现,只要维护上次EWMA即可。

扩展开来则会发现,从i往前的datapoint,权重依次为α, α(1-α), α(1-α)^2….., α(1-α)^n,依次指数递减,权重的和的极限等于1。

smoothing factor决定了EWMA的 时效性 和 稳定性。α越大时效性越好,越能反映出最近数据状态;α越小越平滑,越能吸收瞬时波动,反映出长期趋势。

EWMA由于其时效性被广泛应用在“根据已有时间序列预测未来数据”的场景中,(在计算机领域)比较典型的应用是在TCP中估计RTT,即从已有的RTT数据计算未来RTT,以确定超时时间。

虽然EWMA中参与计算的是全部datapoint,但它也有类似SMA “N天EWMA”的概念,此时α由N决定:α = 2/(N+1),关于这个公式的由来参见这里

回到Skyline,这里并不是用EWMA来预测未来datapoint,而是类似之前的算法求出整体序列的mean和stdDev,只不过计算时加入了时间的权重(EWMA),越近的数据对结果影响越大,即判断的参照物是最近某段时间而非全序列; 再用last datapoint与之比较。因此它的优势在于:

  1. 可以检测到一个异常较短时间后发生的另一个(不太高的突变型)异常,其他算法很有可能会忽略,因为第一个异常把整体的平均水平和标准差都拉高了
  2. 比其他算法更快对异常作出反应,因为它更多的是参考突变之前的点(低水平),而非总体水平(有可能被某个异常或者出现较多次的较高的统计数据拉高)

而劣势则是

  1. 对渐进型而非突发型的异常检测能力较弱
  2. 异常持续一段时间后可能被判定为正常

mean_subtraction_cumulation

def mean_subtraction_cumulation(timeseries):
    """
    A timeseries is anomalous if the value of the next datapoint in the
    series is farther than a standard deviation out in cumulative terms
    after subtracting the mean from each data point.
    """

    series = pandas.Series([x[1] if x[1] else 0 for x in timeseries])
    series = series - series[0:len(series) - 1].mean()
    stdDev = series[0:len(series) - 1].std()
    expAverage = pandas.stats.moments.ewma(series, com=15)

    return abs(series.iget(-1)) > 3 * stdDev

算法如下:

  1. 排除全序列(暂称为all)最后一个值(last datapoint),求剩余序列(暂称为rest,0..length-2)的mean;
  2. rest序列中每个元素减去rest的mean,再求standard deviation;
  3. 求last datapoint到rest mean的距离,即 abs(last datapoint – rest mean);
  4. 判断上述距离是否超过rest序列std. dev.的3倍。

简单地说,就是用最后一个datapoint和剩余序列比较,比较的过程依然遵循3-sigma。这个算法有2个地方很可疑:

  1. 求剩余序列的std. dev.时先减去mean再求,这一步是多余的,对结果没影响;
  2. 虽然用tail_avg已经很不科学了,这个算法更进一步,只判断最后一个datapoint是否异常,这要求在两次analysis间隔中最多只有一个datapoint被加入,否则就会丢失数据。关于这个问题的讨论,见这篇文章最末。

和stddev_from_average相比,该算法对于 “毛刺” 判断为异常的概率远大于后者。

least_squares

def least_squares(timeseries):
    """
    A timeseries is anomalous if the average of the last three datapoints
    on a projected least squares model is greater than three sigma.
    """

    x = np.array([t[0] for t in timeseries])
    y = np.array([t[1] for t in timeseries])
    A = np.vstack([x, np.ones(len(x))]).T
    results = np.linalg.lstsq(A, y)
    residual = results[1]
    m, c = np.linalg.lstsq(A, y)[0]
    errors = []
    for i, value in enumerate(y):
    	projected = m * x[i] + c
    	error = value - projected
    	errors.append(error)

    if len(errors) < 3:
    	return False

    std_dev = scipy.std(errors)
    t = (errors[-1] + errors[-2] + errors[-3]) / 3

    return abs(t) > std_dev * 3 and round(std_dev) != 0 and round(t) != 0
  1. 用最小二乘法得到一条拟合现有datapoint value的直线;
  2. 用实际value和拟合value的差值组成一个新的序列error;
  3. 求该序列的stdDev,判断序列error的tail_avg是否>3倍的stdDev

因为最小二乘法的关系,该算法对直线形的metrics比较适用。该算法也有一个问题,在最后判定的时候,不是用tail_avg到error序列的mean的距离,而是直接使用tail_avg的值,这无形中缩小了异常判定范围,也不符合3-sigma。

最小二乘法

对于一个点对序列(xi,yi),用一条直线去拟合它,如果某直线 Y=aX+b,使得实际值yi和拟合值Yi的误差的平方和最小,则该直线为最优的。

小结

可以看到上述算法都是类似的思路:用最近的若干datapoint做样本,和一个总体序列进行比对,不同的只是比对的对象:

  • stddev_from_average
    tail_avg  ———  整个序列
  • first_hour_average
    tail_avg  ———-  FULL_DURATION开始的一个小时
  • stddev_from_moving_average
    last datapoint ———–  整个序列的EW mean和EW std dev
  • mean_subtraction_cumulation
    last datapoint ———  剩余序列
  • least_squares
    last datapoint ——– 真实数据和拟合直线间的差值序列

grubbs

def grubbs(timeseries):
    """
    A timeseries is anomalous if the Z score is greater than the Grubb's score.
    """

    series = scipy.array([x[1] for x in timeseries])
    stdDev = scipy.std(series)
    mean = np.mean(series)
    tail_average = tail_avg(timeseries)
    z_score = (tail_average - mean) / stdDev
    len_series = len(series)
    threshold = scipy.stats.t.isf(.05 / (2 * len_series) , len_series - 2)
    threshold_squared = threshold * threshold
    grubbs_score = ((len_series - 1) / np.sqrt(len_series)) * np.sqrt(threshold_squared / (len_series - 2 + threshold_squared))

    return z_score > grubbs_score

Grubbs测试是一种从样本中找出outlier的方法,所谓outlier,是指样本中偏离平均值过远的数据,他们有可能是极端情况下的正常数据,也有可能是测量过程中的错误数据。使用Grubbs测试需要总体是正态分布的。

Grubbs测试步骤如下:

  1. 样本从小到大排序;
  2. 求样本的mean和std.dev.;
  3. 计算min/max与mean的差距,更大的那个为可疑值;
  4. 求可疑值的z-score (standard score),如果大于Grubbs临界值,那么就是outlier;
    Grubbs临界值可以查表得到,它由两个值决定:检出水平α(越严格越小),样本数量n
  5. 排除outlier,对剩余序列循环做 1-5 步骤。

由于这里需要的是异常判定,只需要判断tail_avg是否outlier即可。代码中还有求Grubbs临界值的过程,看不懂。

Z-score (standard score)

标准分,一个个体到集合mean的偏离,以标准差为单位,表达个体距mean相对“平均偏离水平(std dev表达)”的偏离程度,常用来比对来自不同集合的数据。

histogram_bins

def histogram_bins(timeseries):
    """
    A timeseries is anomalous if the average of the last three datapoints falls
    into a histogram bin with less than 20 other datapoints (you'll need to tweak
    that number depending on your data)

    Returns: the size of the bin which contains the tail_avg. Smaller bin size
    means more anomalous.
    """

    series = scipy.array([x[1] for x in timeseries])
    t = tail_avg(timeseries)
    h = np.histogram(series, bins=15)
    bins = h[1]
    for index, bin_size in enumerate(h[0]):
        if bin_size <= 20:
            # Is it in the first bin?
            if index == 0:
                if t <= bins[0]:
                    return True
            # Is it in the current bin?
            elif t >= bins[index] and t < bins[index + 1]:
                    return True

    return False

该算法和以上都不同,它首先将timeseries划分成15个宽度相等的直方,然后判断tail_avg所在直方内的元素是否<=20,如果是,则异常。

直方的个数和元素个数判定需要根据自己的metrics调整,不然在数据量小的时候很容易就异常了。

ks_test

def ks_test(timeseries):
    """
    A timeseries is anomalous if 2 sample Kolmogorov-Smirnov test indicates
    that data distribution for last 10 minutes is different from last hour.
    It produces false positives on non-stationary series so Augmented
    Dickey-Fuller test applied to check for stationarity.
    """

    hour_ago = time() - 3600
    ten_minutes_ago = time() - 600
    reference = scipy.array([x[1] for x in timeseries if x[0] >= hour_ago and x[0] < ten_minutes_ago])
    probe = scipy.array([x[1] for x in timeseries if x[0] >= ten_minutes_ago])

    if reference.size < 20 or probe.size < 20:
        return False

    ks_d,ks_p_value = scipy.stats.ks_2samp(reference, probe)

    if ks_p_value < 0.05 and ks_d > 0.5:
        adf = sm.tsa.stattools.adfuller(reference, 10)
        if  adf[1] < 0.05:
            return True

    return False

这个算法比较高深,它将timeseries分成两段:最近10min(probe),1 hour前 -> 10 min前这50分钟内(reference),两个样本通过Kolmogorov-Smirnov测试后判断差异是否较大。如果相差较大,则对refercence这段样本进行 Augmented Dickey-Fuller 检验(ADF检验),查看其平稳性,如果是平稳的,说明存在从平稳状态(50分钟)到另一个差异较大状态(10分钟)的突变,序列认为是异常的。

关于这两个检验过于学术了,以上只是我粗浅的理解。

Kolmogorov-Smirnov test

KS-test有两个典型应用:

  1. 判断某个样本是否满足某个已知的理论分布,如正态/指数/均匀/泊松分布;
  2. 判断两个样本背后的总体是否可能有相同的分布,or 两个样本间是否可能来自同一总体, or 两个样本是否有显著差异。

检验返回两个值:D,p-value,不太明白他们的具体含义,Skyline里当 p-value < 0.05 && D > 0.5 时,认为差异显著。

Augmented Dickey-Fuller test (ADF test)

用于检测时间序列的平稳性,当返回的p-value小于给定的显著性水平时,序列认为是平稳的,Skyline取的临界值是0.05。

median_absolute_deviation

def median_absolute_deviation(timeseries):
    """
    A timeseries is anomalous if the deviation of its latest datapoint with
    respect to the median is X times larger than the median of deviations.
    """

    series = pandas.Series([x[1] for x in timeseries])
    median = series.median()
    demedianed = np.abs(series - median)
    median_deviation = demedianed.median()

    # The test statistic is infinite when the median is zero,
    # so it becomes super sensitive. We play it safe and skip when this happens.
    if median_deviation == 0:
        return False

    test_statistic = demedianed.iget(-1) / median_deviation

    # Completely arbitary...triggers if the median deviation is
    # 6 times bigger than the median
    if test_statistic > 6:
        return True

该算法不是基于mean/ standard deviation的,而是基于median / median of deviations (MAD)。

Median

大部分情况下我们用mean来表达一个集合的平均水平(average),但是在某些情况下存在少数极大或极小的outlier,拉高或拉低了(skew)整体的mean,造成估计的不准确。此时可以用median(中位数)代替mean描述平均水平。Median的求法很简单,集合排序中间位置即是,如果集合总数为偶数,则取中间二者的平均值。

Median of deviation(MAD)

同mean一样,对于median我们也需要类似standard deviation这样的指标来表达数据的紧凑/分散程度,即偏离average的平均距离,这就是MAD。MAD顾名思义,是deviation的median,而此时的deviation = abs( 个体 – median ),避免了少量outlier对结果的影响,更robust。

现在算法很好理解了:求出序列的MAD,看最后datapoint与MAD的距离是否 > 6个MAD。同样的,这里用最后一个datapoint判定,依然存在之前提到的问题;其次,6 是个“magic number”,需要根据自己metrics数据特点调整。

该算法的优势在于对异常更加敏感:假设metric突然变很高并保持一段时间,基于标准差的算法可能在异常出现较短时间后即判断为正常,因为少量outlier对标准差的计算是有影响的;而计算MAD时,若异常datapoint较少会直接忽略,因此感知异常的时间会更长。

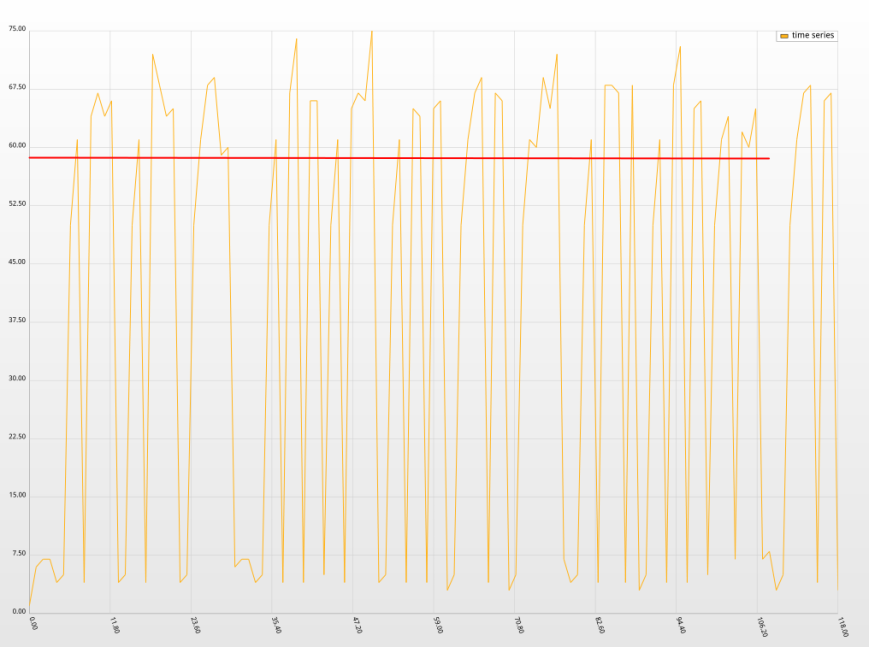
但正如Median的局限性,该算法对于由多个cluster组成的数据集,即数据分布在几个差距较大的区间内,效果很差,很容易误判。比如下图:
选区_008
该曲线在两个区间内来回震荡,此时median为58,如红线所示。MAD计算则为9,很明显均不能准确描述数据集,最后节点的deviation=55,此时误判了。

参考资料

各种Wiki
各种API文档
前辈的总结:【Etsy 的 Kale 系统】skyline 的过滤算法
Moving Averages: What Are They?
Kolmogorov-Smirnov检验
Grubbs检验法
Median absolute deviation
《Head first statistics》

Skyline监控系统工作原理分析

概述

Skyline是一个实时的异常监测系统,它被动地接收metrics数据,并使用一系列算法自动地判断metrics是否异常,此外,用户可以很容易地根据自己应用数据的特点,提供自己的异常检测算法。Skyline还提供了一个web Ui接口,异常的metrics会在webapp中得到展示。

Skyline内部由3个组件组成:Horizon/Analyzer/Webapp:

选区_007

Horizon负责接收外部发送过来的datapoint并转发到Redis,同时从Redis中删除过时的datapoint(所谓datapoint是指某个metric在一个特定时间点的数据,它包含timestamp和value)。Analyzer从Redis获取metrics数据,并使用算法判断是否异常。最后Webapp以图表的方式向用户展示异常的metrics。

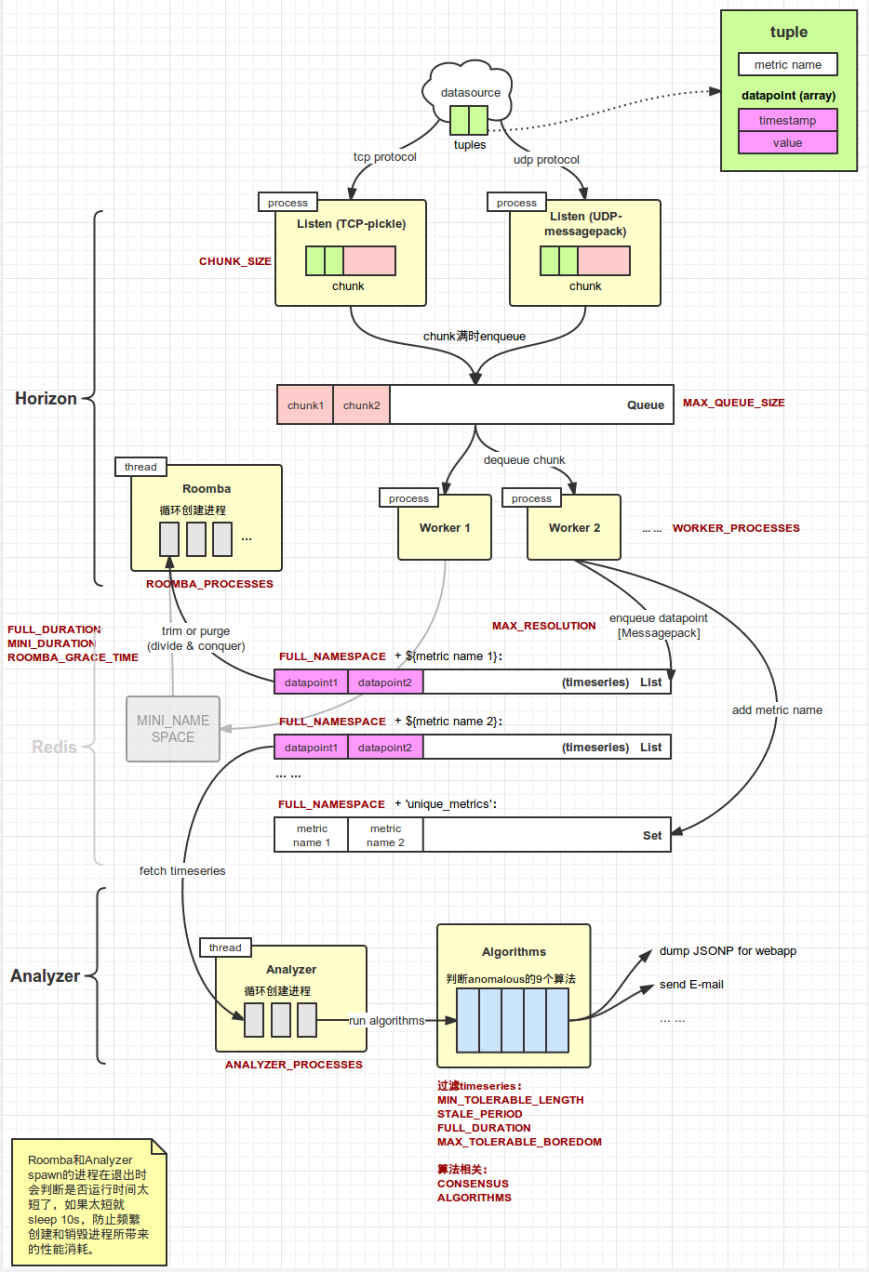
Horizon和Analyzer的工作流程如下图所示,红色字体标注的是settings.py中定义的配置项:

skyline

Horizon

Horizon是Skyline的数据收集器,它由3个角色组成:Listener/Worker/Roomba。Horizon通过bin/horizon.d启停。

horizon

Listener

Listener负责接收外部发送过来的数据,每个Listener是一个进程,目前会启动两种类型的Listener:TCP和UDP,它们使用的应用层协议不同,且数据的序列化方式也不同。应用向horizon发送metric数据时是以tuple为单位的,一个tuple的格式如下所示,表示某个metric在某个时刻的值:

tuple == (metric_name, datapoint) == (metric_name, [timestamp,value])

TCP pickle

TCP类型的Listener使用的序列化方式是cPickle,应用层协议如下:

+----------------------------+-------------------------------------------------------------------------------+
| length(4 bytes)            | [ [tuple1,tuple2...(of metric 'A')], [tuple1,tuple2...(of metric 'B')], ...]  |
+----------------------------+-------------------------------------------------------------------------------+

前4个字节是length,表示后续数据的长度。接下来是一个使用cPickle序列化的数组,tuple根据metric name分组,每组是该数组内的一个元素。

UDP messagepack

UDP类型的Listener使用的序列化方式是msgpack,应用层协议为:

+---------+
|  tuple  |
+---------+

是的,很简单,把tuple用msgpack序列化后发送即可。因为UDP可以保持消息边界的特性,因此不需要length字段。

Listener接收datapoint后将其缓存在内部的Chunk队列中,其长度由CHUNK_SIZE决定;Chunk满后被放入一个公共的队列Queue中,该队列的长度为MAX_QUEUE_SIZE。

Worker

Worker负责处理公共队列Queue中的Chunk,Horizon在启动时会创建WORKER_PROCESSES个worker进程,不停地从Queue中出队Chunk,将Chunk内的datapoint经msgpack序列化后,按其所属的metric添加到对应的Redis队列中。

Skyline在Redis中定义了两个namespace:FULL_NAMESPACE和MINI_NAMESPACE,MINI的作用稍微次要一点,我们先忽略它,后面提及Roomba时再讲解。两个namespace下的结构都是一致的:

  1. FULL_NAMESPACE + ${metric name} ==> List [ datapoint1,datapoint2,datapoint3 … ] (timeseries)
    每个metric都有一个List保存着它所对应的datapoint集合,这个List在Skyline中又被称为timeseries,它保存着该metric在一段时间内的取值序列。
  2. FULL_NAMESPACE + ‘unique_metrics’  ==> Set [metric name 1,  metric name 2, … ]
    该Set保存着所有metric的名字以便快速查找。

Worker根据Chunk内tuple所携带的metric name信息,将datapoint发送到Redis的两个namespace中以供Analyzer模块分析。

Roomba

Roomba负责清除Redis各timeseries中过时的datapoint,只留下最近某段时间内的datapoint,保证Redis不爆掉。Horizon启动时会启动Roomba线程(Roomba和Worker不太一样,它是继承Thread的,虽然它的实际工作都是靠创建的进程完成的),对FULL和MINI两个namespace分别创建ROOMBA_PROCESSES个进程,从FULL/MINI_NAMESPACE + ‘unique_metrics’ 中找到所有的metrics并均匀地分配给每个进程处理。后者对每个分配的timeseries,删除距当前FULL/MINI_DURATION + ROOMBA_GRACE_TIME秒前的datapoint;如果整个timeseries都过时了,则该metric的List会从Redis中删除,同时metric name也会从set中删除。

所有进程都退出后,Roomba线程继续循环,即将进行下一轮进程的创建。为了防止Redis中数据很少时,进程快速的创建和退出带来的性能消耗,每个进程在退出时都会判断运行的时间,如果小于30s,则休眠10s。

因此,Roomba的工作其实就是保证Redis两个namespace下各个timeseries始终是“最近的”一段数据,其时间跨度由FULL_DURATION/MINI_DURATION(以及ROOMBA_GRACE_TIME)指定。FULL命名空间下的timeseries是Analyzer分析的对象,MINI下的并不会被分析,它的作用只在于在web UI中为用户提供某个metric最近一个小时间段(MINI_DURATION)内的概览。此外,MINI namespace还用于和Oculus配合工作,Oculus是Esty公司出品的另一个系统,我们这里忽略掉。

Analyzer

analyzer

经过Horizon的处理,Redis中已经保存了若干timeseries,Analyzer负责对其进行分析,同时提供了一系列算法判断timeseries是否异常的(anomalous)。

Analyzer

Analyzer也是一个线程,它的工作方式和Roomba几乎一致,启动后创建ANALYZER_PROCESSES个进程,平均分配FULL_NAMESPACE下的所有timeseries,每个timeseries被送入Algorithms模块处理,判断是否异常并返回异常的datapoint、报告异常的算法。

所有进程分析完毕后,Analyzer将异常metrics的相关信息dump到webapp的anomalies.json文件中,随后webapp将会通过JSONP请求该文件,得到异常信息并展示。此外,Analyzer还将根据配置的Email信息发送预警邮件。

最后,Analyzer线程判断整个分析过程耗时,如果<5s,则休眠10s,醒后重新进入下一轮进程创建。这里和Roomba有点差别,Roomba的休眠由各个进程判断,而这里是由Analyzer线程进行。

Algorithms

这里是判断异常的核心所在,Skyline内置了9个算法来判断一个datapoint序列是否异常,用户可以根据自己应用的特征配置要使用的算法(ALGORITHMS配置项),或者自定义自己的判定算法。

run_selected_algorithm(timeseries)方法中,timeseries首先会经过一系列合法性验证:

  1. datapoint数目太少(< MIN_TOLERABLE_LENGTH):TooShort异常
  2. 过时(最后一个datapoint在 STALE_PERIOD 秒前):Stable异常
  3. 时间跨度太短(两端datapoint时间之差 < FULL_DURATION):Incomplete异常
  4. 重复数据太多(最后MAX_TOLERABLE_BOREDOM个datapoint都是一个值):Boring异常

验证后将timeseries送入所选算法中进行异常判断。每个算法都会返回Boolean值,true表示异常,false表示正常。当有>CONSENSUS个算法判断为异常时,该timeseries才会被认为是anomalous的。最终返回3个值:是否异常 | 判定为异常的算法集合 | 异常datapoint,异常datapoint目前统一为序列最后3个datapoint的平均值,这和判断异常的算法是相关的,关于Skyline内置的9个算法的分析参见这里。

Webapp

Webapp基于Flask框架提供异常metrics的图表展现,是一个比较简单的模块,就不展开了。基本原理是向后台轮询anomalies.json,得到异常的metrics名称及对应的异常datapoint,之后根据metrics name向后台请求Redis中的timeseries序列(包括FULL/MINI namespace),并用图表展示出来。借用官网的一张图:

需要一提的是,图中所示1 hour和24 hour下的图表,分别是从MINI和FULL NAMESPACE中取得的timeseries数据,它们的时间跨度分别由参数MINI_DURATION和FULL_DURATION决定,并非固定的1小时或24小时,只不过页面上是这么写死的。

问题

  1. Roomba对同一timeseries两次trim的时间间隔在10s以上,Analyzer是5s以上,如果FULL_DURATION过短(比如几秒),则两次analysis之间的Roomba过程可能将第一次分析后加入的新datapoint删除,当两次analysis的间隔 > FULL_DURATION时就有可能会发生这种情况。因此使用Skyline时不能将分析的单位时间跨度FULL_DURATION设置的过短;同时选择的算法不宜过多太复杂,否则一次analysis的耗时比FULLL_DURATION还高,就有可能出现上述问题。
  2. 现在大部分的异常判定算法都是取timeseries的最后3个datapoint和整体序列进行比较,如果某些metrics的发送频率较快,在两次analysis的间隔(不考虑算法的运行时间的话5s-15s)内发送了多于3个的datapoint,这样,在第二次analysis时,就会忽略掉N-3个数据,假如异常刚好发生在倒数第4个datapoint处,则检测不到。因此metrics发送的频率(resolution)也不宜过高。

我在Skyline的group里向作者提到了这两个疑问,作者的回答是:

  1. 第一种情况不太可能出现,因为实际中Analyzer的耗时大概在一两分钟,远低于通常设置的FULL_DURATION;
  2. 的确会有这样的情况,Analyzer需要重写以便分析这段时间内所有加入的datapoint,而不仅仅是最后3个。

总结

本文大致分析了Skyline的各个角色和工作原理,总的来说,Skyline是一个简单精巧的监控工具,但从代码来看有些地方的处理方式不太一致,在调试的过程中发现了一个比较明显的bug(不过作者的反应很快),给人的感觉不太严谨;其他的问题还有待于实际应用中发现。最后,Skyline的规模对Python的初学者是个很好的源码阅读教材~

RST及java socket关闭时的各种异常

RST

TCP/IP协议中,连接正常关闭时双方会发送FIN,经历4次挥手过程。此外,还可以通过RST包异常退出,此时会丢弃缓冲区内的数据,也不会发ACK。

java中,调用Socket#close()可以关闭Socket,该方法类似Unix网络编程中的close方法,将Socket的读写都关闭,已经排队等待发送的数据会被尝试发送,最后(默认)发送FIN。考虑一个典型的网络事务,A向B发送数据,A发送完毕后close(),FIN发送出去;B一直read直到返回了-1,也通过close()发送FIN,4次挥手,连接关闭,一切都很和谐。

那什么时候会用RST而非FIN关闭连接呢?

  1. Socket#setSoLinger(true,0),则close时会发送RST
  2. 如果主动关闭方缓冲区还有数据没有被应用层消费掉,close会发送RST并忽略这些数据

此外,还有一种情况会出现RST:

A向B发送数据,B已经通过close()方法关闭了Socket,虽然TCP规定半关闭状态下B仍然可以接收数据,但close动作关闭了该socket上的任何数据操作,如果此时A继续write,B将返回RST,A的该次write无法立即通知应用层,只会把状态保存在tcp协议栈内,下次write时才会抛出SocketException。

Socket关闭时的异常

Socket关闭时会涉及各式各样的异常,以下总结了常见的几类:

主动关闭方

close()后,无论是发送FIN/RST,之后再读写均会抛java.net.SocketException:socket is closed异常

被动关闭方

收到FIN

  1. 写(即向”已被对方关闭的Socket”写) —  如上所说,第一次write得到RST响应但不抛异常,第二次write抛异常,ubuntu下是broken pipe (断开的管道),win7下是Software caused connection abort: socket write error
  2. 读 — 始终返回 -1

收到RST

读写都会抛出异常:connection reset (by peer)

重点在于:

  1. connection reset:另一端用RST主动关闭连接
  2. broken pipe / Software caused connection abort: socket write error : 对方已调用Socket#close()关闭连接,己方还在写数据

以上情况都写了代码并结合wireshark抓包测试,比较简单就不贴出来了。

java中网络编程时很大一部分代码在做各种fail时的处理,了解各种异常发生时背后的逻辑才能正确地处理之。以上列举的只是连接关闭的异常,还有其他各种异常没有提及,以后有机会再补上。

怎么避免意外的RST(及其带来的各种异常)?

针对几种出现RST的情况:

  1. 利用应用层协议定义结构化的数据,双方对何时数据发送/接收完毕/可以安全关闭连接有明确一致的契约;
  2. close之前消费掉数据;
  3. 需要在半关闭状态下读数据时,使用shutdownOutput(),它会发送FIN但依然可以读取数据;等对方发送FIN,read返回-1后再调用close()释放socket。

参考资料

Orderly Versus Abortive Connection Release in Java
UNIX网络编程——shutdown 与 close 函数 的区别
几种TCP连接中出现RST的情况

p.s     java程序员还是得熟悉底层理论以及Unix下的C编程。

hadoop开启远程调试

1. 修改bin/hadoop,在启动daemon进程之前加入如下代码:

# Turn on debug mode if neccesary
debug_file="$bin/hadoop.debug"
is_debug_enabled()
{
if [ -f $debug_file ]; then
cat $debug_file | grep $1 >/dev/null 2>&1
fi
}

case "$COMMAND" in
namenode)
DEBUG_PORT=11000
;;
datanode)
DEBUG_PORT=11001
;;
jobtracker)
DEBUG_PORT=11002
;;
tasktracker)
DEBUG_PORT=11003
;;
secondarynamenode)
DEBUG_PORT=11004
;;
esac

if is_debug_enabled $COMMAND && [ ! -z $DEBUG_PORT ]; then
echo "debug for $COMMAND is enabled, port is $DEBUG_PORT"
HADOOP_OPTS="$HADOOP_OPTS -Xdebug -Xnoagent -Djava.compiler=NONE -Xrunjdwp:transport=dt_socket,address=$DEBUG_PORT,suspend=y,server=y"
fi

想要调试哪个进程,即在bin/hadoop.debug中添加该进程的角色如namenode/datanode,调试端口号是直接写死在脚本的。

2. eclipse中,debug -> debug configuration -> 添加remote java application -> 填入ip和DEBUG_PORT号。

Debug Configurations _005

[转] Hadoop源代码导入eclipse

From:http://blog.cloudera.com/blog/2013/05/how-to-configure-eclipse-for-hadoop-contributions/

Contributing to Apache Hadoop or writing custom pluggable modules requires modifying Hadoop’s source code. While it is perfectly fine to use a text editor to modify Java source, modern IDEs simplify navigation and debugging of large Java projects like Hadoop significantly. Eclipse is a popular choice thanks to its broad user base and multitude of available plugins.

This post covers configuring Eclipse to modify Hadoop’s source. (Developing applications against CDH using Eclipse is covered in a different post.) Hadoop has changed a great deal since our previous post on configuring Eclipse for Hadoop development; here we’ll revisit configuring Eclipse for the latest “flavors” of Hadoop. Note that trunk and other release branches differ in their directory structure, feature set, and build tools they use. (The EclipseEnvironment Hadoop wiki page is a good starting point for development on trunk.)

This post covers the following main flavors:

  • The traditional implementation of MapReduce based on the JobTracker/TaskTracker architecture (MR1) running on top of HDFS. Apache Hadoop 1.x and CDH3 releases, among others, capture this setup.
  • A highly-scalable MapReduce (MR2) running over YARN and an improved HDFS 2.0 (Federation, HA, Transaction IDs), captured by Apache Hadoop 2.x and CDH4 releases.
  • Traditional MapReduce running on HDFS-2 — that is, the stability of MR1 running over critical improvements in HDFS-2. CDH4 MR1 ships this configuration.

The below table captures the releases and the build tools they use along with the preferred version:

Release

Build Tool (preferred version)

CDH3 (Hadoop 1.x)

Ant (1.8.2)

CDH4 (Hadoop 2.x) HDFS

Maven (3.0.2)

CDH4 (Hadoop 2.x) MR2

Maven (3.0.2)

CDH4 MR1

Ant (1.8.2)

Other Requirements:

  • Oracle Java 1.6 or later
  • Eclipse (Indigo/Juno)

Setting Up Eclipse

  1. First, we need to set a couple of classpath variables so Eclipse can find the dependencies.
    1. Go to Window -> Preferences.
    2. Go to Java -> Build Path -> Classpath Variables.
    3. Add a new entry with name ANT_PATH and path set to the ant home on your machine, typically /usr/share/ant.
    4. Add another new entry with name M2_REPO and path set to your maven repository, typically $HOME/.m2/repository (e.g. /home/user/.m2/repository).

  2. Hadoop requires tools.jar, which is under JDK_HOME/lib. Because it is possible Eclipse won’t pick this up:
    1. Go to Window->Preferences->Installed JREs.
    2. Select the right Java version from the list, and click “Edit”.
    3. In the pop-up, “Add External JARs”, navigate to “JDK_HOME/lib”, and add “tools.jar”.

  3. Hadoop uses a particular style of formatting. When contributing to the project, you are required to follow the style guidelines: Java formatting with all spaces and indentation as well as tabs set to 2 spaces. To do that:
    1. Go to Window -> Preferences.
    2. Go to Java->Code Style -> Formatter.
    3. Import this Formatter.

    4. It is a good practice to enable automatic formatting of the modified code when you save a file. To do that, go to Window->Preferences->Java->Editor->Save Actions and select “Perform the selected actions on save”, “Format source code”, “Format edited lines”. Also, de-select “Organize imports”.

  4. For Maven projects, the m2e plugin can be very useful. To install the plugin, go to Help -> Install New Software. Enter “http://download.eclipse.org/technology/m2e/releases” into the “Work with” box and select  the m2e plugins and install them.

Configuration for Hadoop 1.x / CDH3

  1. Fetch Hadoop using version control systems subversion or git and checkout branch-1 or the particular release branch. Otherwise, download a source tarball from the CDH3 releases or Hadoop releases.
  2. Generate Eclipse project information using Ant via command line:
    1. For Hadoop (1.x or branch-1), “ant eclipse”
    2. For CDH3 releases, “ant eclipse-files”
  3. Pull sources into Eclipse:
    1. Go to File -> Import.
    2. Select General -> Existing Projects into Workspace.
    3. For the root directory, navigate to the top directory of the above downloaded source.

Configuration for Hadoop 2.x / CDH4 MR2

Apache Hadoop 2.x (branch-2/trunk based) and CDH4.x have the same directory structure and use Maven as the build tool.

  1. Again, fetch sources using svn/git and checkout appropriate branch or download release source tarballs (followCDH Downloads).
  2. Using the m2e plugin we installed earlier:
    1. Navigate to the top level and run “mvn generate-sources generate-test-sources”.
    2. Import project into Eclipse:
      1. Go to File -> Import.
      2. Select Maven -> Existing Maven Projects.
      3. Navigate to the top directory of the downloaded source.

    3. The generated sources (e.g. *Proto.java files that are generated using protoc) might not be directly linked and can show up as errors. To fix them, select the project and configure the build path to include the java files under target/generated-sources and target/generated-test-sources. For inclusion pattern, select “**/*.java”.

  3. Without using the m2e plugin:
    1. Generate Eclipse project information using Maven: mvn clean && mvn install -DskipTests && mvn eclipse:eclipse. Note: mvn eclipse:eclipse generates a static .classpath file that Eclipse uses, this file isn’t automatically updated as the project/dependencies change.
    2. Pull sources into Eclipse:
      1. Go to File -> Import.
      2. Select General -> Existing Projects into Workspace.
      3. For the root directory, navigate to the top directory of the above downloaded source.

Configuration for CDH4 MR1

CDH4 MR1 runs the stable version of MapReduce (MR1) on top of HDFS from Hadoop 2.x branches. So, we have to set up both HDFS and MapReduce separately.

  1. Follow Steps 1 and 2 of the previous section (Hadoop 2.x).
  2. Download MR1 source tarball from CDH4 Downloads and untar into a folder different than the one from Step 1.
  3. Within the MR1 folder, generate Eclipse project information using Ant via command line (ant eclipse-files).
  4. Configure .classpath using this perl script to make sure all classpath entries point to the local Maven repository:
    1. Copy the script to the top-level Hadoop directory.
    2. Run $ perl configure-classpath.pl
  5. Pull sources into Eclipse:
    1. Go to File -> Import.
    2. Select General -> Existing Projects into Workspace.
    3. For the root directory, navigate to the top directory of the above downloaded sources.

Happy Hacking!

[转]Hadoop版本选择的探讨

转载自董的博客

由于Hadoop版本混乱多变,因此,Hadoop的版本选择问题一直令很多初级用户苦恼。本文总结了Apache Hadoop和Cloudera Hadoop的版本衍化过程,并给出了选择Hadoop版本的一些建议。

1. Apache Hadoop

1.1  Apache版本衍化

截至目前(2012年12月23日),Apache Hadoop版本分为两代,我们将第一代Hadoop称为Hadoop 1.0,第二代Hadoop称为Hadoop 2.0。第一代Hadoop包含三个大版本,分别是0.20.x,0.21.x和0.22.x,其中,0.20.x最后演化成1.0.x,变成了稳定版,而0.21.x和0.22.x则NameNode HA等新的重大特性。第二代Hadoop包含两个版本,分别是0.23.x和2.x,它们完全不同于Hadoop 1.0,是一套全新的架构,均包含HDFS Federation和YARN两个系统,相比于0.23.x,2.x增加了NameNode HA和Wire-compatibility两个重大特性。

经过上面的大体解释,大家可能明白了Hadoop以重大特性区分各个版本的,总结起来,用于区分Hadoop版本的特性有以下几个:

(1)Append     支持文件追加功能,如果想使用HBase,需要这个特性。

(2)RAID        在保证数据可靠的前提下,通过引入校验码较少数据块数目。详细链接:

https://issues.apache.org/jira/browse/HDFS/component/12313080

(3)Symlink    支持HDFS文件链接,具体可参考: https://issues.apache.org/jira/browse/HDFS-245

(4)Security    Hadoop安全,具体可参考:https://issues.apache.org/jira/browse/HADOOP-4487

(5) NameNode HA  具体可参考:https://issues.apache.org/jira/browse/HDFS-1064

(6) HDFS Federation和YARN

需要注意的是,Hadoop 2.0主要由Yahoo独立出来的hortonworks公司主持开发。

1.2  Apache版本下载

(1) 各版本说明:http://hadoop.apache.org/releases.html

(2) 下载稳定版:找到一个镜像,下载stable文件夹下的版本。

(3) Hadoop最全版本:http://svn.apache.org/repos/asf/hadoop/common/branches/,可直接导到eclipse中。

2. Cloudera Hadoop

2.1  CDH版本衍化

Apache当前的版本管理是比较混乱的,各种版本层出不穷,让很多初学者不知所措,相比之下,Cloudera公司的Hadoop版本管理的要很多。

我们知道,Hadoop遵从Apache开源协议,用户可以免费地任意使用和修改Hadoop,也正因此,市面上出现了很多Hadoop版本,其中比较出名的一是Cloudera公司的发行版,我们将该版本称为CDH(Cloudera Distribution Hadoop)。截至目前为止,CDH共有4个版本,其中,前两个已经不再更新,最近的两个,分别是CDH3(在Apache Hadoop 0.20.2版本基础上演化而来的)和CDH4在Apache Hadoop 2.0.0版本基础上演化而来的),分别对应Apache的Hadoop 1.0和Hadoop 2.0,它们每隔一段时间便会更新一次。

Cloudera以patch level划分小版本,比如patch level为923.142表示在原生态Apache Hadoop 0.20.2基础上添加了1065个patch(这些patch是各个公司或者个人贡献的,在Hadoop jira上均有记录),其中923个是最后一个beta版本添加的patch,而142个是稳定版发行后新添加的patch。由此可见,patch level越高,功能越完备且解决的bug越多。

Cloudera版本层次更加清晰,且它提供了适用于各种操作系统的Hadoop安装包,可直接使用apt-get或者yum命令进行安装,更加省事。

2.2 CDH版本下载

(1) 版本含义介绍:

https://ccp.cloudera.com/display/DOC/CDH+Version+and+Packaging+Information

(2)各版本特性查看:

https://ccp.cloudera.com/display/DOC/CDH+Packaging+Information+for+Previous+Releases

(3)各版本下载:

CDH3:http://archive.cloudera.com/cdh/3/

CDH4:http://archive.cloudera.com/cdh4/cdh/4/

注意,Hadoop压缩包在这两个链接中的最上层目录中,不在某个文件夹里,很多人进到链接还找不到安装包!

3. 如何选择Hadoop版本

当前Hadoop版本比较混乱,让很多用户不知所措。实际上,当前Hadoop只有两个版本:Hadoop 1.0和Hadoop 2.0,其中,Hadoop 1.0由一个分布式文件系统HDFS和一个离线计算框架MapReduce组成,而Hadoop 2.0则包含一个支持NameNode横向扩展的HDFS,一个资源管理系统YARN和一个运行在YARN上的离线计算框架MapReduce。相比于Hadoop 1.0,Hadoop 2.0功能更加强大,且具有更好的扩展性、性能,并支持多种计算框架。

当我们决定是否采用某个软件用于开源环境时,通常需要考虑以下几个因素:

(1)是否为开源软件,即是否免费。

(2) 是否有稳定版,这个一般软件官方网站会给出说明。

(3) 是否经实践验证,这个可通过检查是否有一些大点的公司已经在生产环境中使用知道。

(4) 是否有强大的社区支持,当出现一个问题时,能够通过社区、论坛等网络资源快速获取解决方法。

考虑到以上几个因素,我们分析一下开源软件Hadoop。对于Hadoop 2.0而言,目前尚不稳定,无法用于生产环境,因此,如果当前你正准备使用Hadoop,那么只能从Hadoop 1.0中选择一个版本,而目截至目前(2012年12月23日),Apache和Cloudera最新的稳定版分别是Hadoop 1.0.4和CDH3U4,因此,你可以从中任选一个使用。

基于堆的外部归并排序

写了一个外部归并排序,比较时用的是堆而不是败者树,先贴个代码:

package algorithm;
    
import java.io.BufferedReader;
import java.io.BufferedWriter;
import java.io.File;
import java.io.FileNotFoundException;
import java.io.FileReader;
import java.io.FileWriter;
import java.io.IOException;
import java.io.Reader;
import java.util.LinkedList;
import java.util.Queue;
import java.util.Random;
    
/**
 * 外部归并排序
 * @author Anderson
 *
 */
public class MergeOuter {
    
    /**=========================== 辅助类 Begin ================================**/
    /**
     * 最小堆
     * @author Anderson
     *
     */
    static class MinHeap {
        int size;
        Wrapper[] heap;
    
        public MinHeap(Wrapper[] array) {
            this.size = array.length;
            heap = array;
            initHeap();
        }
    
        private void initHeap() {
            for (int i = size / 2 - 1; i >= 0; i--) {
                sink(i);
            }
        }
    
        private void sink(int i) {
            while (2 * i + 1 < size) { // sink的一定要有左孩子,否则什么都不做。(若有右孩子,则一定有左孩子)
                int j = 2 * i + 1;
                if (j + 1 < size && heap[j + 1].compareTo(heap[j]) < 0)
                    j++;
                if (heap[i].compareTo(heap[j]) <= 0)
                    break;
                swap(i, j);
                i = j;
            }
        }
    
        private void swim(int i) {
            while (i > 0) {
                int parent = (i - 1) / 2;
                if (heap[i].compareTo(heap[parent]) < 0)
                    swap(i, parent);
                else
                    break;
                i = parent;
            }
        }
    
        private void swap(int i, int j) {
            Wrapper w = heap[i];
            heap[i] = heap[j];
            heap[j] = w;
        }
    
    
        public Wrapper removeMin() {
            Wrapper min = heap[0];
            heap[0] = heap[size - 1];
            size--;
            sink(0);
            return min;
        }
    
        public Wrapper getMin() {
            return heap[0];
        }
    
        public void setMin(char c) {
            heap[0].c = c;
            sink(0);
        }
    
        public void add(Wrapper w) {
            if (size == heap.length)
                throw new RuntimeException("add when heap is full,this should not happen!");
            heap[size] = w;
            swim(size);
            size++;
        }
    }
    
    /**
     * 字符和文件Reader的Wrapper
     * @author Anderson
     *
     */
    static class Wrapper implements Comparable<Wrapper> {
        Reader r;
        char c;
    
        public int compareTo(Wrapper o) {
            return c - o.c;
        }
    }
    /**=========================== 辅助类 End ================================**/
    
    
    /**
     * 随机输出指定数目字符到指定文件,测试用
     *
     * @param n 字符数
     * @param dir 输入文件目录
     * @param file 输入文件名
     * @throws IOException
     */
    private static void randomCharsToFile(int n, String dir, String file) throws IOException {
        Random r = new Random();
        File inputFile = new File(dir + file);
        if (inputFile.exists())
            inputFile.delete();
        BufferedWriter w = new BufferedWriter(new FileWriter(inputFile));
        for (int i = 0; i < n; i++) {
            char c = (char) (r.nextInt(93) + '!');
            w.write(c);
        }
        w.close();
    }
    
    
    /**
     * 初始归并段的大小
     */
    static int numPerFile = 4 * 1024;
    static char[] buffer = new char[numPerFile];
    
    private static void sort(String dir, String inputFile, String outputFile,int way) throws IOException {
        // 切分成小文件,内部排序(快速排序)后输出到磁盘
        BufferedReader inputReader = new BufferedReader(new FileReader(new File(dir + inputFile)));
        int readNum = 0;
        int tmpFileIndex = 1;
        Queue<File> filesToMerge = new LinkedList<File>();  // 待归并的文件队列
        while ((readNum = inputReader.read(buffer)) > 0) {
            String filePath = dir + "tmp-" + tmpFileIndex + ".txt";
            sortAndOutput(buffer, 0, readNum - 1, filePath);
            filesToMerge.offer(new File(filePath));
            tmpFileIndex++;
        }
        inputReader.close();
    
        // 多路归并
        int counter = 1; // 第几趟归并
    
        while (filesToMerge.size() > 1) {
            // 构造堆
            MinHeap h = buildHeap(way, filesToMerge);
    
            // 利用堆进行一次归并,并将输出文件放入待归并文件队列末尾
            File merged = new File(dir + "merged-" + counter++ + ".txt");
            BufferedWriter mergedWriter = new BufferedWriter(new FileWriter(merged));
            while (h.size > 0) {
                // 输出堆顶到文件(不删除堆顶)
                Wrapper w = h.getMin();
                mergedWriter.write(w.c);
    
                // 读入最小元素所在文件的下一个字符并调整堆;文件读取完毕则将堆顶移除,并关闭文件
                // 这种方式相对于先removeMin再add,可以省略一次堆调整
                int readed = w.r.read();
                if(readed != -1) {
                    h.setMin((char)readed);
                }else {
                    h.removeMin();
                    w.r.close();
                }
            }
            mergedWriter.close();
            filesToMerge.offer(merged);
        }
    
        // 待归并文件队列中只剩下一个文件时,排序完成
        filesToMerge.poll().renameTo(new File(dir + outputFile));
    }
    
    /**
     * 根据待归并文件队列和归并路数构造用于比较的最小堆
     *
     * @param way
     * @param filesToMerge
     * @return
     * @throws FileNotFoundException
     * @throws IOException
     */
    private static MinHeap buildHeap(int way, Queue<File> filesToMerge) throws FileNotFoundException, IOException {
        int mergeFileNum = Math.min(filesToMerge.size(), way);
        Wrapper[] heap = new Wrapper[mergeFileNum];
        for (int i = 0; i < mergeFileNum; i++) {
            Wrapper w = new Wrapper();
            w.r = new FileReader(filesToMerge.poll());
            w.c = (char) w.r.read();
            heap[i] = w;
        }
        MinHeap h = new MinHeap(heap);
        return h;
    }
    
    /**
     * 对字符数组排序并输出到文件
     *
     * @param c 字符数组
     * @param s 开始index
     * @param e 结束index
     * @param file 输出文件
     * @throws IOException
     */
    private static void sortAndOutput(char[] c, int s, int e, String file) throws IOException {
        quickSort(c, s, e);
        File f = new File(file);
        if (f.exists())
            f.delete();
        BufferedWriter w = new BufferedWriter(new FileWriter(f));
        w.write(c, s, e - s + 1);
        w.close();
    }
    
    private static void quickSort(char[] c2, int s, int e) {
        if (c2 == null || e <= s)
            return;
        int i = partition(c2, s, e);
        quickSort(c2, s, i - 1);
        quickSort(c2, i + 1, e);
    }
    
    private static int partition(char[] c, int s, int e) {
        int p = s;
        int i = s;
        int j = e;
        while (i < j) {
            while (c[j] >= c[p] && j > s) j--;
            while (c[i] <= c[p] && i < e) i++;
            if (i < j)
                swap(c, i, j);
        }
        swap(c, p, j);
        return j;
    }
    
    private static void swap(char[] c, int i, int j) {
        char t = c[i];
        c[i] = c[j];
        c[j] = t;
    }
    
    /**
     * 10M数据,128路归并,归并段大小4K:内存盘4.9s/硬盘6.8s
     * 20M数据,128路归并,归并段大小4K:内存盘9.1s/硬盘12.2s
     */
    public static void main(String[] args) throws IOException {
        String input = "input.txt";
        String dir = "F:\\test\\";
        randomCharsToFile(20 * 1024 * 1024, dir, input);
        long s = System.currentTimeMillis();
        MergeOuter.sort(dir, input, "sorted.txt",128);
        long e = System.currentTimeMillis();
        System.out.println("耗时:" + (double) (e - s) / 1000.0D);
    }
    
}

Httpfs安装和配置

1.  编译和打包
在git上check代码,https://github.com/cloudera/httpfs,,根据hadoop版本选择相应分支,我的是cdh3u4.

mvn package -Pdist -Dmaven.test.skip=true

target下会生成hadoop-hdfs-httpfs-0.20.2-cdh3u4.tar.gz压缩包。

2. 安装
拷贝tar包到hadoop集群节点上,解压缩:

scp -P3351 hadoop-hdfs-httpfs-0.20.2-cdh3u4.tar.gz hadoop@localhost:~/ # 虚拟机中搭建了hadoop伪分布式环境
tar xzf hadoop-hdfs-httpfs-0.20.2-cdh3u4.tar.gz

3. 配置httpfs

By default, HttpFS assumes that Hadoop configuration files (core-site.xml & hdfs-site.xml) are in the HttpFS configuration directory.

If this is not the case, add to the httpfs-site.xml file the httpfs.hadoop.config.dir property set to the location of the Hadoop configuration directory.

上面提到的HttpFS configuration directory 为 ${httpfs_home}/etc/hadoop,如果不想把hdfs的配置文件copy过来,则应当修改该目录下的httpfs-site.xml,加入如下配置:

<property>
<name>httpfs.hadoop.config.dir</name>
<value>${HADOOP_HOME}/conf</value>  <!-- 替换掉${HADOOP_HOME} -->
</property>

4. 配置hadoop
设置hadoop proxyuser的用户/用户组/host

Edit Hadoop core-site.xml and defined the Unix user that will run the HttpFS server as a proxyuser. For example:

<property>
<name>hadoop.proxyuser.#HTTPFSUSER#.hosts</name>
<value>httpfs-host.foo.com</value>
</property>
<property>
<name>hadoop.proxyuser.#HTTPFSUSER#.groups</name>
<value>*</value>
</property>

IMPORTANT: Replace #HTTPFSUSER# with the Unix user that will start the HttpFS server.

由于我是本机搭建的,且hadoop的用户和组分别是hadoop/hadoop,因此我的配置如下:

<property>
<name>hadoop.proxyuser.hadoop.hosts</name>
<value>127.0.0.1</value>
</property>
<property>
<name>hadoop.proxyuser.hadoop.groups</name>
<value>*</value>
</property>

5. 重启hadoop

6. 启动httpfs

# cd到${HTTPFS_HOME}
sbin/httpfs.sh start

7. 测试一下

hadoop@h1:~/httpfs/hadoop-hdfs-httpfs-0.20.2-cdh3u4$ curl -i "http://localhost:14000/webhdfs/v1/?op=gethomedirectory&user.name=abcd"
HTTP/1.1 200 OK
Server: Apache-Coyote/1.1
Set-Cookie: hadoop.auth="u=abcd&p=abcd&t=simple&e=1377028064511&s=zeetFPQ3grb6C/I7MIe9p47cLro="; Version=1; Path=/
Content-Type: application/json
Transfer-Encoding: chunked
Date: Tue, 20 Aug 2013 09:47:44 GMT

{"Path":"\/user\/abcd"}

完。

参考资料:
http://cloudera.github.com/httpfs/

网卡中断负载均衡

中断和异常

  1. 异常 exception通常在cpu执行指令发生出现错误时产生。常见的异常有除零/溢出/页面异常。异常是同步的,只有在一条指令执行完毕后 CPU 才会发出中断。异常分为3种:
    • 故障 fault:潜在可恢复的错误,如page fault
    • 终止 abort:不可恢复的错误
    • 陷阱 trap:有意的异常,如int指令。操作系统用这种方式实现系统调用。
  2. 中断 interrupt由硬件向cpu发起interrupt request(irq),异步,即可以在cpu执行指令时发出。中断分为可屏蔽和非屏蔽中断。

中断和异常的handler都是运行在内核空间的。

每个中断/异常都有一个向量号,操作系统根据向量号在中断向量表(IDT)中查询得到处理函数的入口地址。

中断/异常的处理过程可以简单地认为按如下方式进行:保存现场 — 执行处理函数 — 恢复现场继续执行。


硬中断和软中断

背景

响应中断时通常会关闭中断,因此处理函数必须快速返回,保证不会丢失其他设备的中断信号。因此通常将中断响应函数划分为两个部分,上半部分就是所谓的硬中断,它只做少量最重要的事以保证快速返回,并在返回前发起对下半部分的调度。下半部分负责其他耗时的工作,它和硬中断的区别在于它在执行时是开中断的,并且是异步的,不能保证在硬中断之后立刻被执行。Linux对“下半部分”的实现有3种方式:softirq/tasklet/bottom half,统称为deferrable functions。其中,tasklet是基于softirq实现的,而bottom half又是基于tasklet实现的。实际上在很多场景下,都使用softirq(软中断)这个术语来描述所有的deferrable functions(中断处理的下半部分)。这三者的区别主要在并发性上:

  • Softirq            Softirqs of the same type can run concurrently on several CPUs
  • Tasklet            Tasklets of different types can run concurrently on several CPUs, but tasklets of the same type cannot
  • Bottom Half    Bottom halves cannot run concurrently on several CPUs.

Linux2.4中仅预定义了4个softirq:

  • HI_SOFTIRQ             用于实现bottom half
  • TASKLET_SOFTIRQ   用于实现tasklet
  • NET_TX_SOFTIRQ    发送网络数据
  • NET_RX_SOFTIRQ    接收网络数据

softirq的相关函数:

  • open_softirq(NET_RX_SOFTIRQ,net_rx_action,null):定义softirq和处理函数;
  • __cpu_raise_softirq(cpu,NET_RX_SOFTIRQ):在指定cpu设置标志位,激活特定类型的softirq,该函数被硬中断调用;默认遵循“谁触发谁执行”的原则,哪个cpu处理硬中断则继续处理发起的softirq;
  • do_softirq():cpu在某些特定的时间点检查自己的softirq标志位,当发现有pending的softirq时则调用该函数处理pending softirq。

可以看到,deferrable functions(大部分语境下的“软中断”)是操作系统模拟硬件中断方式实现异步任务的一种机制,它和硬件中断执行的机制具有本质的区别。

详细可参考下列文档:

查看系统的中断情况

  • 查看硬中断:/proc/interrupts

从左到右依次是irq的序号, 在各自cpu上发生中断的次数,可编程中断控制器,设备名称。其中ath9k是我的无线网卡,eth0是有线网卡(未使用)。

机器的cpu为:

的确有4个逻辑核心。

  • 软中断可以从/proc/softirqs 了解到:
anderson@anderson-nb:~$ cat /proc/softirqs
                    CPU0       CPU1       CPU2       CPU3
          HI:          0          0          0          0
       TIMER:     890234     858500     620927     519799
      NET_TX:       3702       3602       2132       1030
      NET_RX:    2257833    1430762    2507556    1331708
       BLOCK:     119552         82       5661         88
       BLOCK_IOPOLL:          0          0          0          0
     TASKLET:      42915     332662    1223525     369765
       SCHED:    1081723     796010     342065     241437
     HRTIMER:       4055       4011       2386       2199
         RCU:     789493     766554     705107     624903
         

也可以用mpstat工具对系统做实时监控,查看各个cpu上softirq的百分比:

anderson@anderson-nb:~$ mpstat -P ALL 1 1
Linux 3.5.0-37-generic (anderson-nb)    2013年08月04日     _i686_  (4 CPU)
17时34分35秒  CPU    %usr   %nice    %sys %iowait    %irq   %soft  %steal  %guest   %idle
17时34分36秒  all    7.05    0.00    1.01    0.00    0.00    0.00    0.00    0.00   91.94
17时34分36秒    0   22.22    0.00    1.01    0.00    0.00    0.00    0.00    0.00   76.77
17时34分36秒    1    3.00    0.00    1.00    0.00    0.00    0.00    0.00    0.00   96.00
17时34分36秒    2    3.00    0.00    1.00    0.00    0.00    0.00    0.00    0.00   96.00
17时34分36秒    3    1.00    0.00    1.00    0.00    0.00    0.00    0.00    0.00   98.00

参考文档


CPU亲缘性

在 SMP 体系结构中,我们可以通过调用系统调用和一组相关的宏来设置 CPU 亲和性(CPU affinity),将一个或多个进程绑定到一个或多个处理器上运行。同样的,也可以为硬中断设置亲和性,将一个或多个中断源绑定到特定的 CPU 上运行。方法是修改/proc/irq/$IRQ序号/smp_affinity,如下所示:

[root@archimedes /proc]# cat /proc/irq/75/smp_affinity
00000001

表示序号为75的设备(这个场景中是有线网卡eth0)只用到了第一个cpu,可以修改这个参数,使它使用多个cpu。

参数:
Binary       Hex
CPU 0    0001         1
CPU 1    0010         2
CPU 2    0100         4
CPU 3    1000         8

参数是一个10进制的值,cpu n == 2 的 n 次方。

如果用cpu0和cpu2:

Binary       Hex
CPU 0    0001         1
CPU 2    0100         4
———————–
both     0101         5

全用:
Binary       Hex
CPU 0    0001         1
CPU 1    0010         2
CPU 2    0100         4
CPU 3    1000         8
———————–
both     1111         f

修改:

echo f &gt; /proc/irq/75/smp_affinity

网卡中断负载均衡

有时网卡的所有(硬)中断都会被同一个CPU响应,并且由于之后触发的软中断也是由该cpu执行的,这会导致无法充分利用多核cpu,此时我们可以用一些手段将中断均匀地平摊到每个核心,利用相对富余的cpu来提升网络吞吐量。

解决方式有两种:

1. 硬中断负载均衡

如前文所述修改smp_affinity文件。以下是在我本机(Ubuntu12.04)做的一个实验。首先cat /proc/interrupts查看中断情况,初始状态如下(只显示无线网卡):

接下来修改该设备的中断cpu亲和性,让cpu0负责处理所有的中断:

echo 1 &gt; /proc/irq/17/smp_affinity

开几个网页,看看视频,查看中断,可以看到cpu1/2/3上的中断数没有任何改变:

然后再修改affinity,将中断处理转移到其他3个核心上:

echo e &gt; /proc/irq/17/smp_affinity

继续监控,结果如下:

cpu0上的中断数量不再变化,1/2/3上处理的中断数一直在增加,符合预期。

2. 使用RPS实现软中断负载均衡

RPS是google贡献的一个patch,基本原理是:根据数据包的源地址,目的地址以及目的和源端口,计算出一个hash值,然后根据这个hash值来选择软中断运行的cpu, 从上层来看,也就是说将每个连接和cpu绑定,并通过这个hash值,来均衡软中断在多个cpu上。详细可以参见Receive packet steering patch详解Linux内核 RPS和RFS功能详细测试分析

// 在机器上用ab工具进行压力测试,mpstat显示softirq一直没有什么大变化,irq更是一直为0。/proc/softirqs中网络相关的两项也同样没多大变化,不知道什么原因。可能是因为用的是无线网卡,和测试机器不在同一个局域网内,网速不够给力。

// TODO 像上面第二篇文章,用netperf和netserver工具做一下性能测试

此外还可以使用irqbalance实现硬中断负载均衡,但是据说效果不好,参见深度剖析告诉你irqbalance有用吗?

这一块水太深,不会。

参考资料:

附:

启动apache的命令:

/etc/init.d/apache2 [start/restart/stop]

HttpFS包结构


.
 └── hadoop
 ├── fs
 │   └── http
 │       ├── client
 │       │   ├── HttpFSFileSystem.java
 │       │   ├── HttpFSKerberosAuthenticator.java
 │       │   ├── HttpFSPseudoAuthenticator.java
 │       │   └── HttpFSUtils.java
 │       └── server    # 启动web app,提供restful服务的相关类
 │           ├── CheckUploadContentTypeFilter.java
 │           ├── FSOperations.java
 │           ├── HttpFSAuthenticationFilter.java
 │           ├── HttpFSExceptionProvider.java
 │           ├── HttpFSKerberosAuthenticationHandler.java
 │           ├── HttpFSParametersProvider.java
 │           ├── HttpFSReleaseFilter.java
 │           ├── HttpFSServer.java    # 提供restful服务的类
 │           └── HttpFSServerWebApp.java    # 用单例的模式提供对Server的访问
 └── lib
 ├── lang
 │   ├── RunnableCallable.java
 │   └── XException.java
 ├── server    # Server的framework类,包括Server/Service相关接口和抽象父类
 │   ├── BaseService.java
 │   ├── ServerException.java
 │   ├── Server.java
 │   ├── ServiceException.java
 │   └── Service.java
 ├── service    # Service的具体实现类;大部分restful接口都是通过代理给这些Service实现的
 │   ├── DelegationTokenIdentifier.java
 │   ├── DelegationTokenManagerException.java
 │   ├── DelegationTokenManager.java
 │   ├── FileSystemAccessException.java
 │   ├── FileSystemAccess.java
 │   ├── Groups.java
 │   ├── hadoop
 │   │   └── FileSystemAccessService.java
 │   ├── instrumentation
 │   │   └── InstrumentationService.java
 │   ├── Instrumentation.java
 │   ├── ProxyUser.java
 │   ├── scheduler
 │   │   └── SchedulerService.java
 │   ├── Scheduler.java
 │   └── security
 │       ├── DelegationTokenManagerService.java
 │       ├── GroupsService.java
 │       └── ProxyUserService.java
 ├── servlet    # 和servlet规范联系紧密的类,包括filter和listener
 │   ├── FileSystemReleaseFilter.java
 │   ├── HostnameFilter.java
 │   ├── MDCFilter.java
 │   └── ServerWebApp.java    # 通过继承ServletContextListener初始化Server
 ├── util
 │   ├── Check.java
 │   └── ConfigurationUtils.java
 └── wsrs
     ├── BooleanParam.java
     ├── ByteParam.java
     ├── EnumParam.java
     ├── ExceptionProvider.java
     ├── InputStreamEntity.java
     ├── IntegerParam.java
     ├── JSONMapProvider.java
     ├── JSONProvider.java
     ├── LongParam.java
     ├── Parameters.java
     ├── ParametersProvider.java
     ├── Param.java
     ├── ShortParam.java
     ├── StringParam.java
     └── UserProvider.java